This article will show you how to setup OAuth 2.0 Authorization using the Grant Type of Authorization Code.
We won’t be going into great depths about what each feature is, we will simply look at how to set it up OAuth 2.0 with our plugin. Here is an article explaining what OAuth 2.0 is if you want to learn more about it before we get started.
Getting Started
For this article, we are going to connect to the Zoho CRM API and retrieve a list of our users within the CRM. Anyone can create a free Zoho account to follow along.
- The docs for setting up the Zoho OAuth 2.0 authorization is here.
- The docs for the Users endpoint can be found here.
Step 1 – Register an application
The first step with any OAuth 2.0 authorization is to register an app. This could also be called registering a client.
Most services will have a ‘Developers Console’ or ‘App Console’ where you can register your apps. Here is a link to the Zoho Developer Console where you will be asked to log in or register and once logged in, you will be asked what type of client (app) you want to create. We want to choose the ‘Server-based Application’. 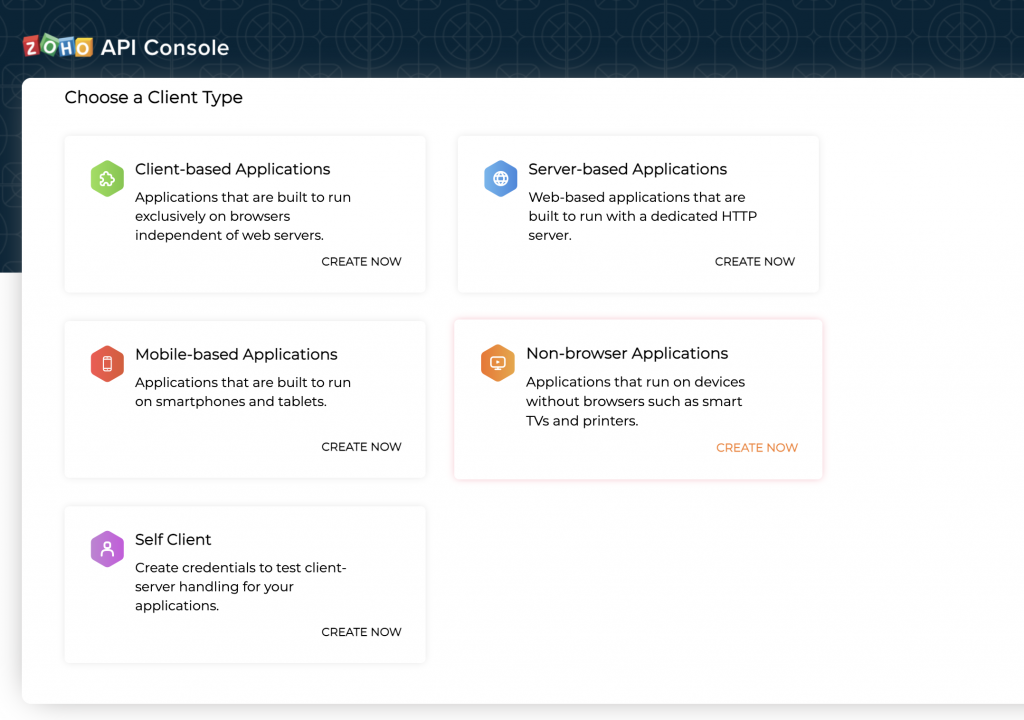
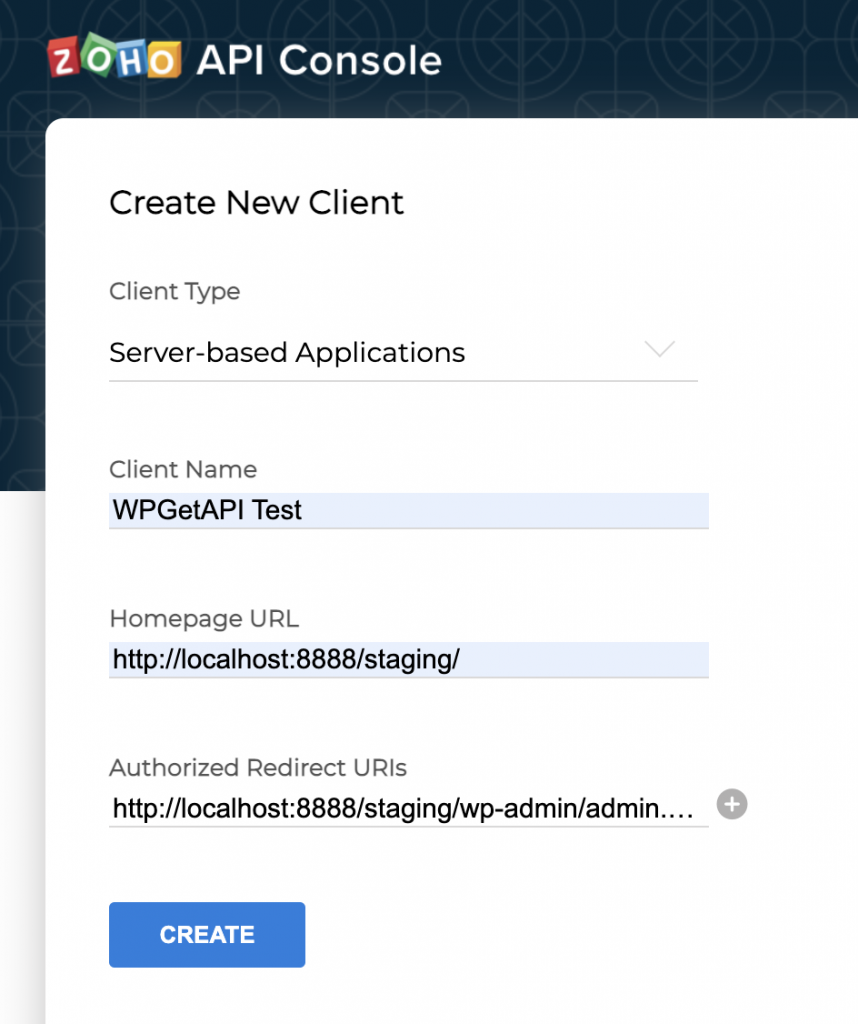
We will then need to fill in 3 fields:
- Client Name – can be whatever we want to call it
- Homepage URL – this is the homepage of our website
- Authorized Redirect URIs – this URL needs to be https://YOURWEBSITE/wp-admin/admin.php?page=wpgetapi_oauth – changing YOURWEBSITE for the URL of your own website. This can also be called the Callback URL.
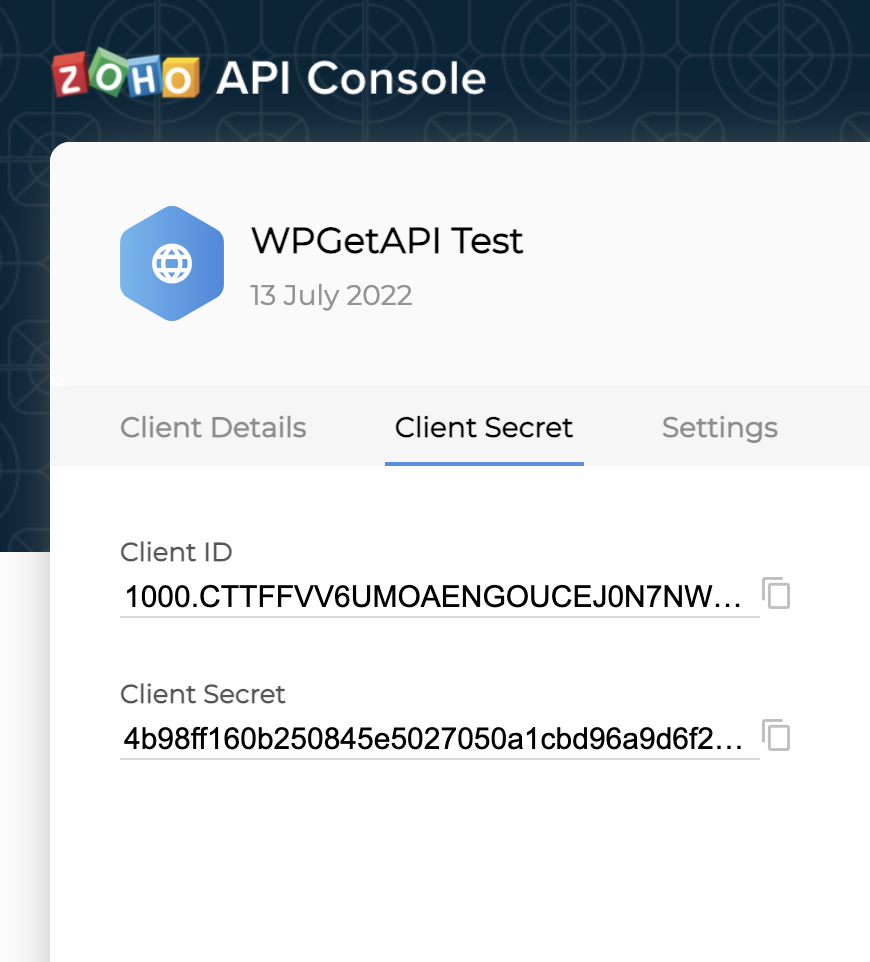
After clicking Create, you will then get the Client ID and the Client Secret, which we will use in the next step.
Step 2 – Configure settings in WPGetAPI
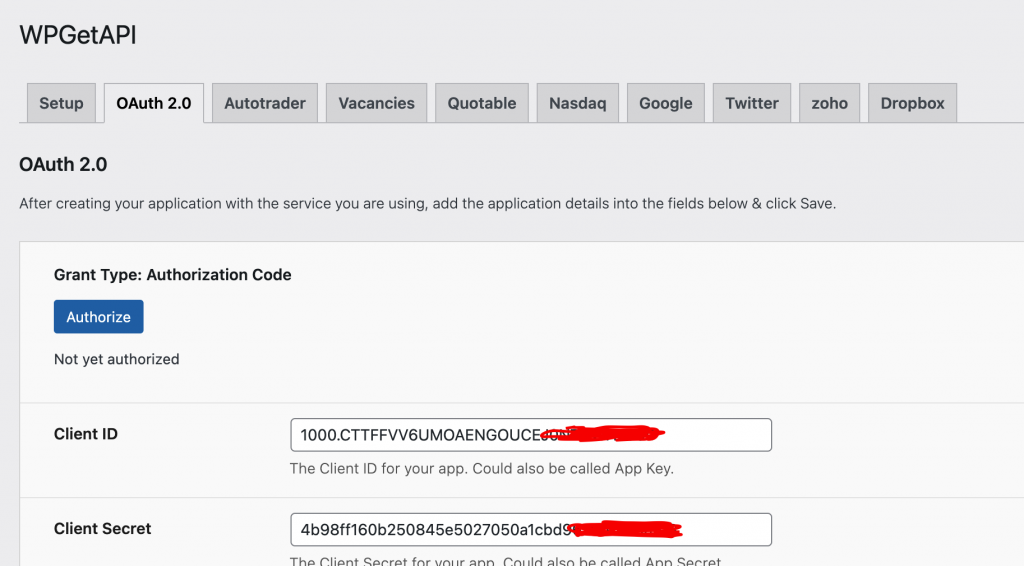
We now need to add all of our app details and some Zoho API details to our OAuth 2.0 settings page within the WordPress admin – the page looks something like the image below.
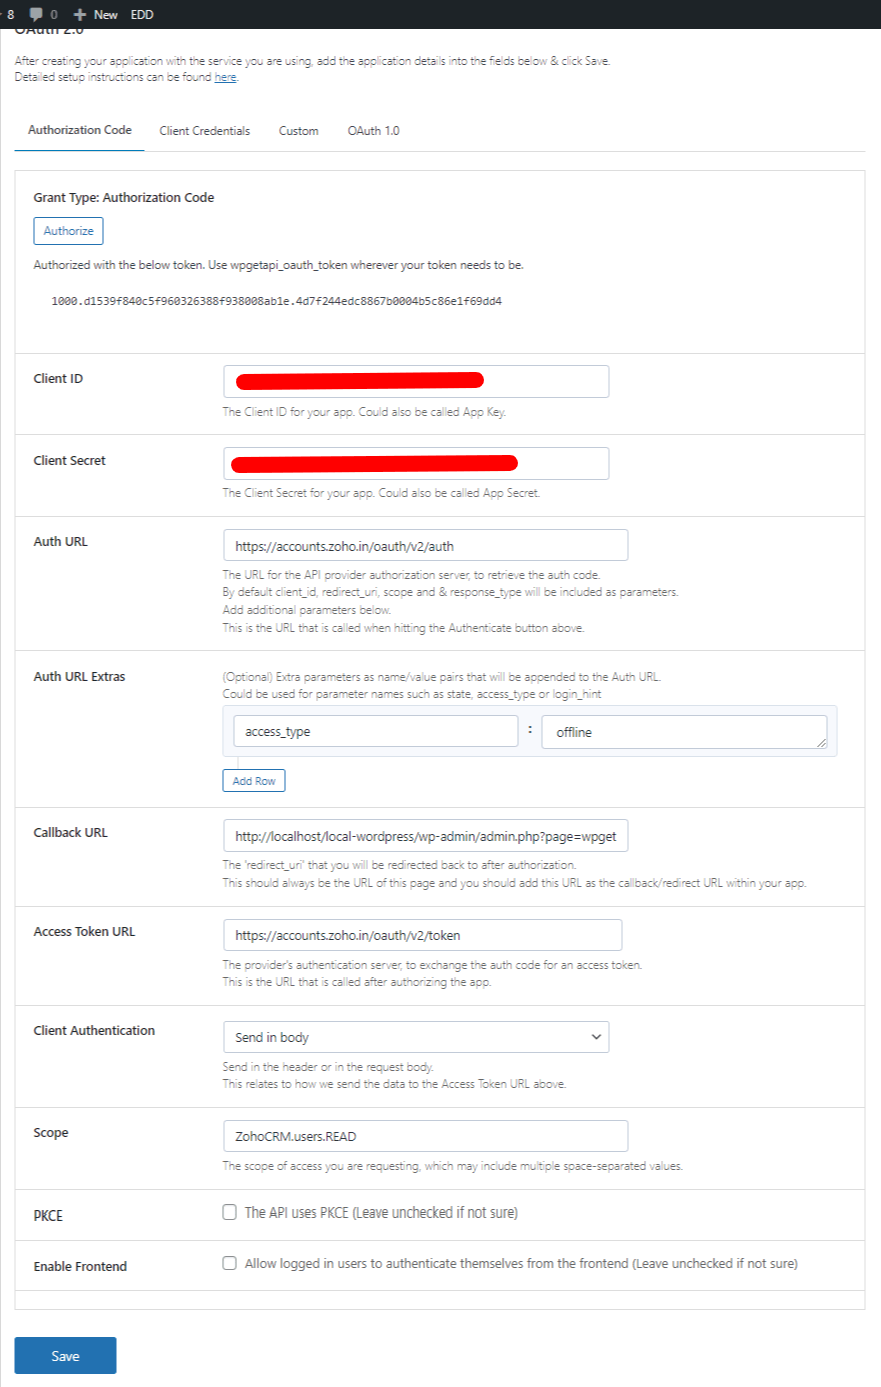
The fields are:
- Client ID – this is the Client ID from our app
- Client Secret – the Client Secret from our app
- Auth URL
- for Zoho, the Auth URL is https://accounts.zoho.in/oauth/v2/auth
- this URL is not an API endpoint, it’s the web page that lets you sign in to Zoho and authorize your app. Our plugin will automatically add some of the required parameters to the end of the URL such as client_id, redirect_uri, scope & response_type
- you can see the required parameters for this URL here – https://www.zoho.com/crm/developer/docs/api/v2/auth-request.html
- Auth URL Extras
- for Zoho, we need to add access_type as the name and offline as the value
- we can add extra parameters to our URL above. A common parameter to add here would be something like state or access_type
- Access Token URL
- Zoho uses region specific URL’s for this one. We are in India, and Zoho recognise that we created our account in India, so we need to use this URL in here:
https://accounts.zoho.in/oauth/v2/token - For more information on regions, please refer to the Zoho documentation here.
- Zoho uses region specific URL’s for this one. We are in India, and Zoho recognise that we created our account in India, so we need to use this URL in here:
- Client Authentication
- This is the method that we use to send data (in the background) to the Access Token URL above. Your API docs will tell you which method to use and in our case, Zoho will Send in body
- The data that we are sending here, is a code that we receive back from Zoho once the app is authorised. There will also be some other pieces of data sent such as client_id and the redirect_uri
- Scope
- For the Scope, we need to go searching a bit here. We need to look at the endpoints that we are going to eventually use and get the scope value from there.
- We just want to be able to ‘read’ our users so we first go to the Users endpoint docs here – https://www.zoho.com/crm/developer/docs/api/v2/get-users.html
- Scrolling down we can find the Scope section, which tells us we need ZohoCRM.users.READ
- If you need multiple scopes, just do the same as above and add each scope into the field with each one separated by a space
- PKCE
- If your API uses PKCE, then you will need to tick this option.
- PKCE is an extra security measure, and your API will clearly state if it is using this.
Step 3 – Authorize our application
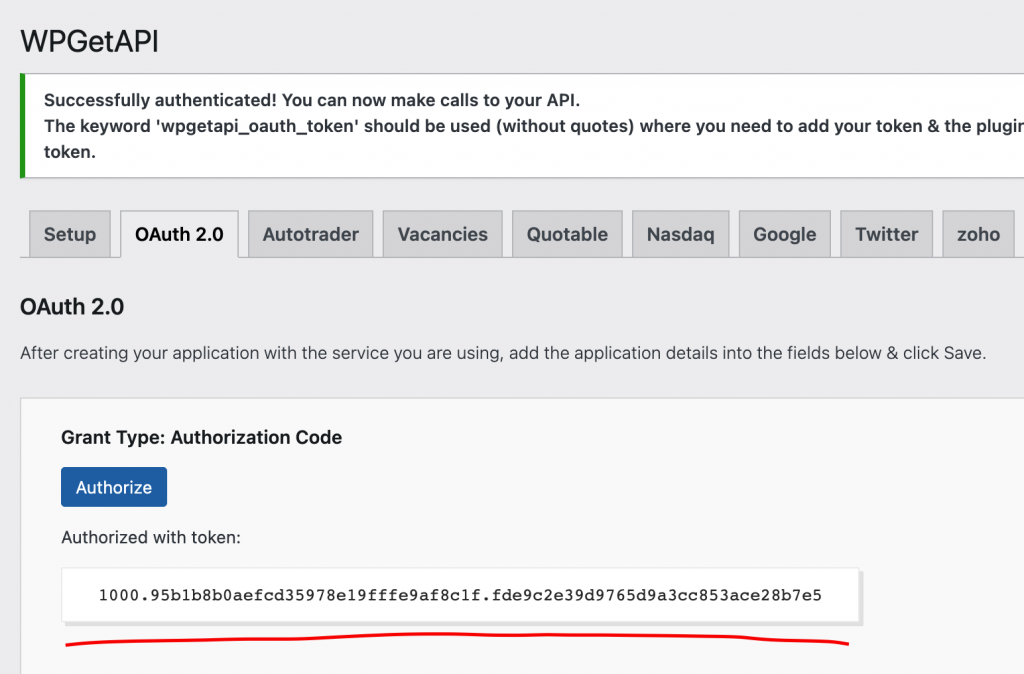
With our details saved, we will now see the Authorize button become active as shown below and we can also see that we have ‘Not yet authorized’.
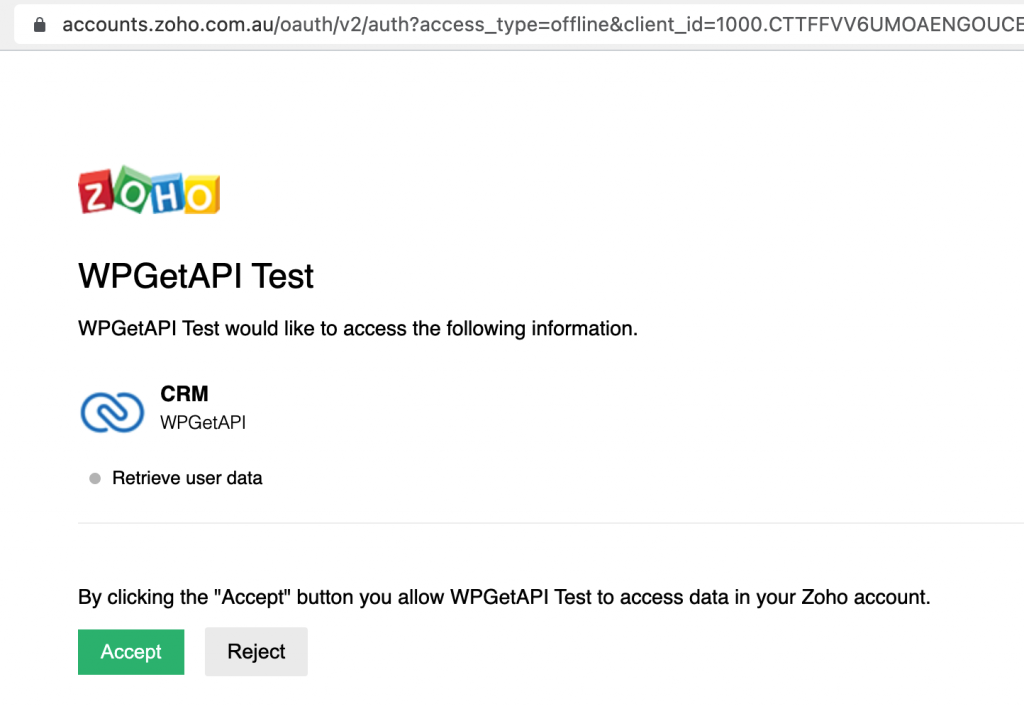
If we are happy that all the details we have entered are correct, we can click the button where we will be taken to Zoho to login and thendo the authorization steps.
Below is the app that we registered – notice the name and the ‘Retrieve user data’ section (that is our scope). We can click accept and we will be taken back to our OAuth 2.0 screen within WordPress.
Our app is now authorized and we can now make our API call to the /users endpoint to get our users data.
Step 4 – Using the token to make API calls
We have a token now and we want to use our token to start making API calls, but we don’t want to actually copy the token and use it anywhere with WPGetAPI.
Access tokens have a limited life and usually expire within minutes or hours of being created. So if we add our token to any API calls, it will not work after the token expiry time. Tokens need to be refreshed when they expire, and this is what our OAuth 2.0 plugin does automatically in the background.
So instead of adding the actual token that we have received, we need to use the keyword ‘wpgetapi_oauth_token’ instead. This keyword basically tells our OAuth 2.0 plugin where we need the token. The plugin will see this keyword and replace the keyword with our refreshed and up-to-date token.
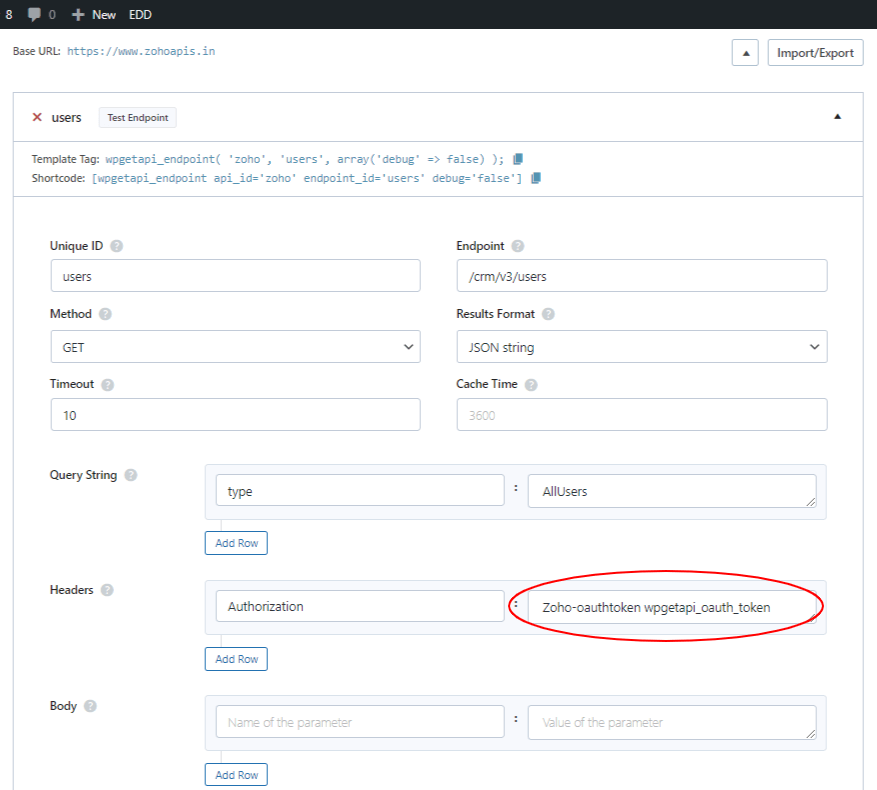
Looking at the Zoho Users endpoint, it shows us that the token needs to be used in the header. Some API’s might also use the token in the query string.
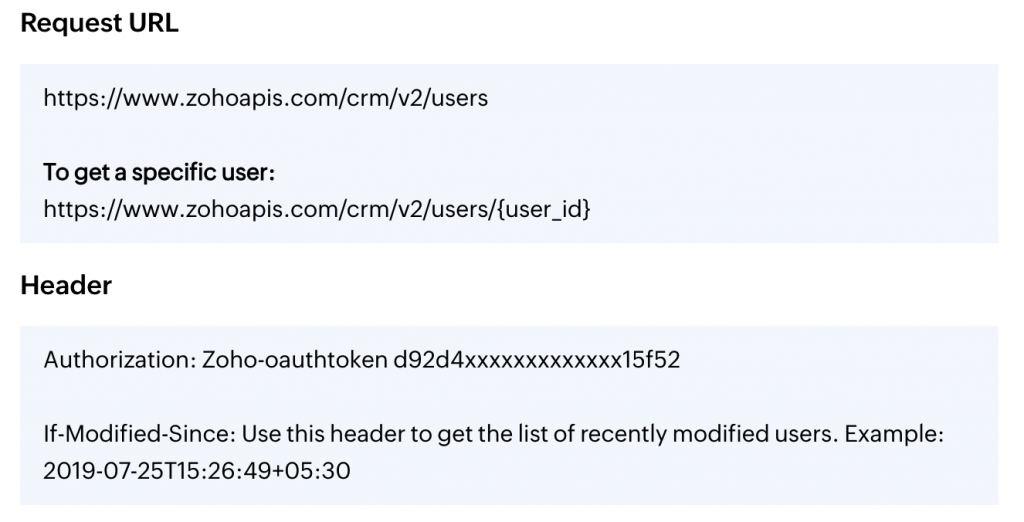
Authorization: Zoho-oauthtoken d92d4xxxxxxxxxxxxxxxxxx15f52But we will use the keyword ‘wpgetapi_oauth_token’ instead of the token, so that it would now look like this:
Authorization: Zoho-oauthtoken wpgetapi_oauth_tokenNow when we setup our endpoint, we just need to add Authorization within the Name field and Zoho-oauthtoken wpgetapi_oauth_token within the Value field of our headers.
You can now use the template tag or the shortcode to call your API endpoints.
Next Steps
We’ve written an article with detailed instructions on Integrating the Zoho CRM API with WordPress that shows how to setup Zoho API endpoints and capture form data to create a new lead.