Skip to content
  • Why WPGetAPI?
  • Examples
  • Pricing
  • Plugins
    • PRO Plugin
    • API to Posts Plugin
    • OAuth 2.0 Plugin
  • Docs
  • Support
    • Frequently Asked Questions
    • Feature Request
    • Support Ticket
  • account_circle
PRO Plugin
Howdy! How can we help you?
  • Introduction

    • Quick Start
    • Frequently Asked Questions
    • Will this work with my API?
    • Understanding API docs
    • Step by Step Example
  • Setup

    • Setup Page
    • Endpoint Page
    • Parameters - Query String
    • Parameters - Headers
    • Parameters - Body POST
    • Shortcode
    • Template Tag
    • Gutenberg Block
  • Connecting your API

    • API Key in Headers
    • API Key in Query String
    • Authentication & Authorization
  • Output API Data

    • Format API to HTML
    • Format API to HTML Table
    • Format API to Image Gallery
    • Format JSON Data
  • Integrations

    • Send form data to API
    • WPForms to API
    • Gravity Forms to API
    • Contact Form 7 to API
    • WooCommerce to API
    • WooCommerce API Product Sync
    • wpDataTables to API
    • Connect WordPress to OpenAI
    • Connect RapidAPI to WordPress
    • Connect Zoho CRM to WordPress
    • Page Builders (Elementor, DIVI)
    • Formidable Forms to API
    • Elementor Form to API
    • JetFormBuilder to API
    • Fluent Forms to API
    • WS Form to API
    • Ninja Tables to API
    • Easy Digital Downloads(EDD) API Product Sync
    • Ultimate Member Forms to API
  • Tips & Tricks

    • Filters & Action Hooks
    • Code Snippets Plugin
    • Troubleshooting
    • Code Snippets
  • PRO Plugin

    • Installation
    • Actions
    • Tokens
    • Caching
    • Nested data
    • Chaining API calls
    • Dynamic Variables
    • Format API to HTML
    • Call API on user registration
    • Using AJAX to trigger API call
    • Base64 Encoding
    • Licensing
    • Filters & Action Hooks
  • OAuth 2.0 Plugin

    • Installation
    • How it works
    • Grant Type - Client Credentials
    • Grant Type - Authorization Code
    • Licensing
  • API to Posts Plugin

    • Installation
    • Getting Started
    • Multiple Endpoints
    • Mapping Fields
    • Filters & Action Hooks
    • Pagination

What are POST fields

POST fields (sometimes called body fields), are key/value pairs of data that are sent within the body of the request to your API, for your API to process. They will only work and be sent when you  have set the Request Method to POST.

POST fields are sent as key/value pairs and are separated by a colon (:) such as this: username: johncitizen

Within your API’s documentation, it should tell you which POST fields (if any) you need to provide.


How to add POST fields

Adding POST fields is possible by simply adding the name/value pairs into the Body POST Fields within the endpoint, as shown below.

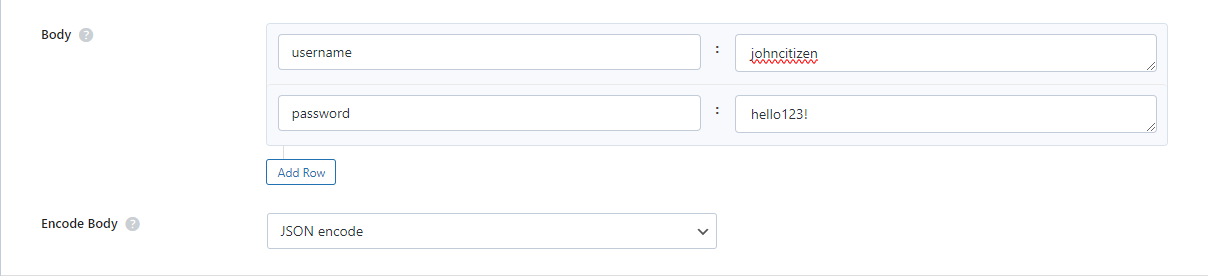
The plugin automatically adds the colon that is required to seperate the key:value, so adding these parameters as shown above will create and send the following POST fields:

username: johncitizen
password: hello123!

You can also choose to encode the body fields using the option shown in the image above. Your API documentation should mention if this is required.


Field values and types

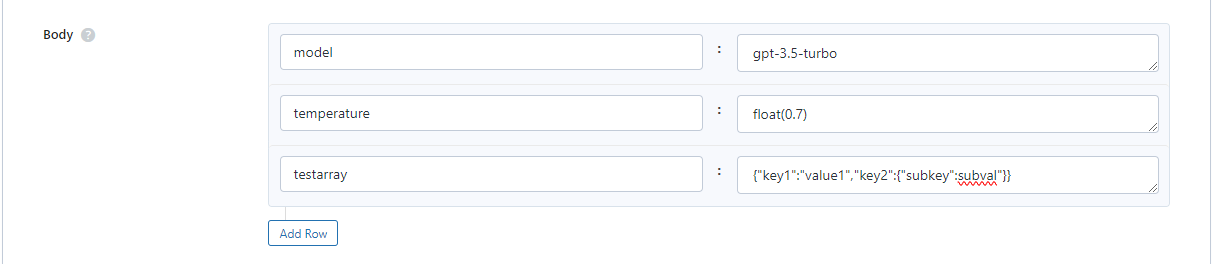
Anything that you add into the Value fields will be sent as a string which is usually fine for most API’s. Some API’s though will require an integer or a float value to be sent (we are looking at you OpenAI).

Integer values

An integer can be sent to the API by using the special function integer(number) – replacing ‘number’ with the integer value you want to send.

Float values

A float value can be sent to the API by using the special function float(number) – replacing ‘number’ with the float value you want to send.

Boolean values

A boolean value can be sent to the API by using the special function boolean(true) or boolean(false) and this will be sent as an actual boolean value and not a string like “true” or “false”.

Arrays

You can add arrays into the value field by using standard JSON format {"key1":"value1","key2":{"subkey":subval"}}.

Raw data

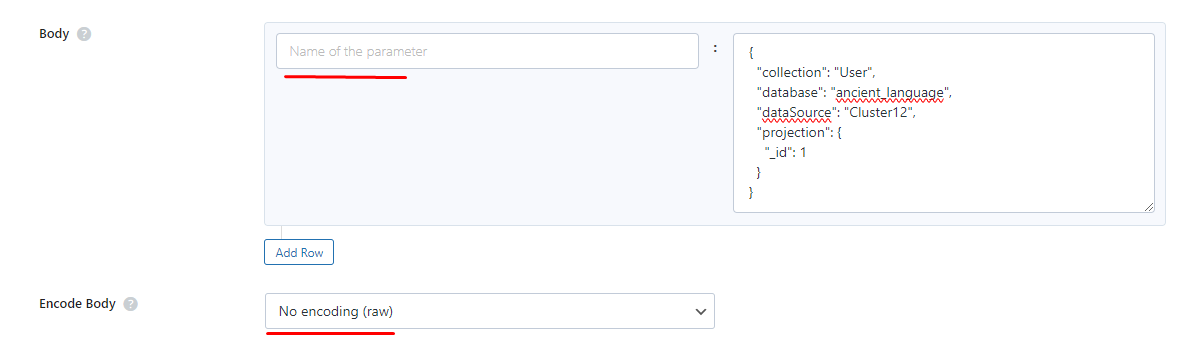
You can send raw body data by adding your data to the Value field and simply leaving the name field blank. Encoding should be set to No Encoding when sending raw body data.


When to use POST fields

You should use POST fields when your API documentation says so!

Using POST fields is only used for POST requests but again, refer to your API’s documentation to know if you need to send POST fields.


Going further

Sometimes you may need to use dynamic variables in the POST fields.

This means that you may need to, for example send a user_id value in the POST fields depending on which user is logged in. This is possible when using the Pro Plugin, which adds a new attribute to the shortcode and template tag.

Here is a guide for using dynamic variables in POST fields.

On this page
contact_support

Still not sure?

APIs can be daunting and sometimes downright confusing.

But we are here to help! Our support is amazing and we can assist you with any setup required and ensure your API integrations are a success!

Ask Us Anything

Connect your WordPress website to external APIs without writing a single line of code. Send data from WordPress to your API or display data from your API within WordPress.

Support

  • Documentation
  • Support Ticket
  • Refund Policy
  • Contact Us
  • About Us
  • Affiliates

Articles

  • Quick Start Guide
  • WooCommerce Orders to API
  • WooCommerce API Products Sync
  • Contact Form 7 to API
  • WPForms to API
  • Gravity Forms to API
  • WordPress to RapidAPI

WordPress API Plugins

  • Free WPGetAPI Plugin
  • PRO Plugin
  • API to Posts Plugin Plugin
  • OAuth 2.0 Authorization Plugin

© 2025 WPGetAPI. All Rights Reserved.

"*" indicates required fields

Name*
This field is for validation purposes and should be left unchanged.