Skip to content
  • Why WPGetAPI?
  • Examples
  • Pricing
  • Plugins
    • PRO Plugin
    • API to Posts Plugin
    • OAuth 2.0 Plugin
  • Docs
  • Support
    • Frequently Asked Questions
    • Feature Request
    • Support Ticket
  • account_circle
PRO Plugin
Howdy! How can we help you?
  • Introduction

    • Quick Start
    • Frequently Asked Questions
    • Will this work with my API?
    • Understanding API docs
    • Step by Step Example
  • Setup

    • Setup Page
    • Endpoint Page
    • Parameters - Query String
    • Parameters - Headers
    • Parameters - Body POST
    • Shortcode
    • Template Tag
    • Gutenberg Block
  • Connecting your API

    • API Key in Headers
    • API Key in Query String
    • Authentication & Authorization
  • Output API Data

    • Format API to HTML
    • Format API to HTML Table
    • Format API to Image Gallery
    • Format JSON Data
  • Integrations

    • Send form data to API
    • WPForms to API
    • Gravity Forms to API
    • Contact Form 7 to API
    • WooCommerce to API
    • WooCommerce API Product Sync
    • wpDataTables to API
    • Connect WordPress to OpenAI
    • Connect RapidAPI to WordPress
    • Connect Zoho CRM to WordPress
    • Page Builders (Elementor, DIVI)
    • Formidable Forms to API
    • Elementor Form to API
    • JetFormBuilder to API
    • Fluent Forms to API
    • WS Form to API
    • Ninja Tables to API
    • Easy Digital Downloads(EDD) API Product Sync
    • Ultimate Member Forms to API
  • Tips & Tricks

    • Filters & Action Hooks
    • Code Snippets Plugin
    • Troubleshooting
    • Code Snippets
  • PRO Plugin

    • Installation
    • Actions
    • Tokens
    • Caching
    • Nested data
    • Chaining API calls
    • Dynamic Variables
    • Format API to HTML
    • Call API on user registration
    • Using AJAX to trigger API call
    • Base64 Encoding
    • Licensing
    • Filters & Action Hooks
  • OAuth 2.0 Plugin

    • Installation
    • How it works
    • Grant Type - Client Credentials
    • Grant Type - Authorization Code
    • Licensing
  • API to Posts Plugin

    • Installation
    • Getting Started
    • Multiple Endpoints
    • Mapping Fields
    • Filters & Action Hooks
    • Pagination

API’s can use both Authentication and/or Authorization to help secure their API’s.  Authentication proves that you are who you say you are. It is like having a drivers license – it proves your identity. Authorization goes a step further and proves that you have the right to access something – that you are authorised to do so.

Authentication and authorization play different roles and are often confused with each other.  But we don’t really need to know the technicalities of it all, we just want to connect to our API, so let’s look at the various ways that WPGetAPI can connect you to your API.

API Keys

This is a very simple method of authentication. If you are using this method then you would have been given an API key by your API provider. The API key could be added to the query string or to the header or to anywhere really.

Here is an article on Adding API keys to the query string

Here is an article on Adding API keys to the header
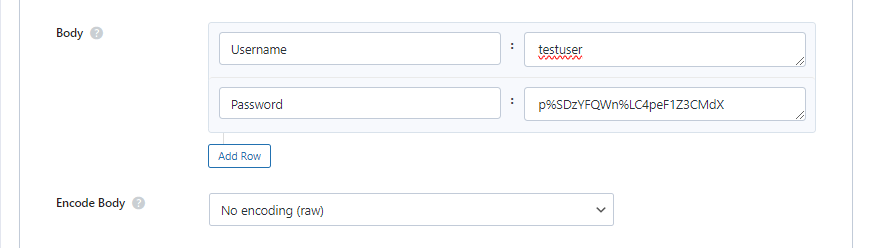
Username & Password

If your API uses a username and password combination, this will usually be added to the Body as POST fields. Looking at the image below you can see that this is easily achieved using WPGetAPI. Some API’s will require these fields to be JSON encoded or URL encoded, which you can choose with the Encode Body option.

username and password API fields

Bearer Token

The bearer token is a text string that is included in the request header and usually looks something like this:

Authorization: Bearer <your_token_here>

To set this up in the plugin, you would add a name/value pair to the Headers section like in the below image. The plugin takes care of joining these together and adding the colon (:).

Bearer Token Authorization

Basic HTTP Authentication – base64 encoded

Basic HTTP Authentication (or basic auth) sends the API a username/password or a clientId/clientSecret combination that is encoded using the base64 method. This is then sent in the header request to the API and will look something like this:

Authorization: Basic <Base64 encoded username and password>

We can use this type of authentication when using the Pro plugin – this authentication method is not available in the free plugin, only the paid version. To be able to use this method, you simply need to add the details into the Headers section as shown in the image below.

By adding the base64_encode() function, the plugin will automatically encode whatever is in between the brackets.

Basic HTTP Authentication WordPress

OAuth 2.0

We support OAuth 2.0 authorization with our OAuth 2.0 plugin.

On this page
contact_support

Still not sure?

APIs can be daunting and sometimes downright confusing.

But we are here to help! Our support is amazing and we can assist you with any setup required and ensure your API integrations are a success!

Ask Us Anything

Connect your WordPress website to external APIs without writing a single line of code. Send data from WordPress to your API or display data from your API within WordPress.

Support

  • Documentation
  • Support Ticket
  • Refund Policy
  • Contact Us
  • About Us
  • Affiliates

Articles

  • Quick Start Guide
  • WooCommerce Orders to API
  • WooCommerce API Products Sync
  • Contact Form 7 to API
  • WPForms to API
  • Gravity Forms to API
  • WordPress to RapidAPI

WordPress API Plugins

  • Free WPGetAPI Plugin
  • PRO Plugin
  • API to Posts Plugin Plugin
  • OAuth 2.0 Authorization Plugin

© 2025 WPGetAPI. All Rights Reserved.

"*" indicates required fields

Name*
This field is for validation purposes and should be left unchanged.